![]() For St Vincent's users click here
For St Vincent's users click here
![]() For RMH users click here (expires Jun 09)
For RMH users click here (expires Jun 09)
Control Central
Welcome |Setting up | Control Central| Generating daily worksheet | Managing patient details |
Maintaining extra patient lists | Path slips | Extra features | Notes on security | Download | Contacts
![]()
The first time you open Control Central the screen looks like this
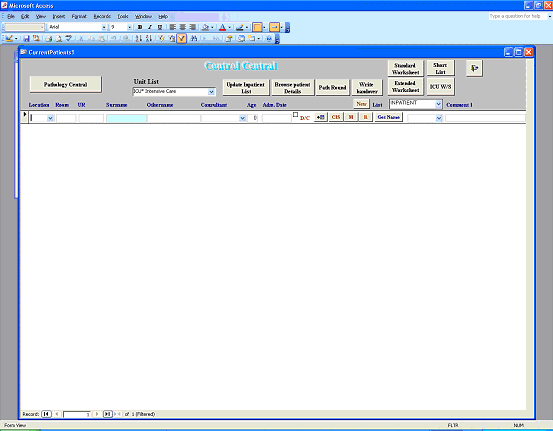
The top (gray coloured) part is containcontrol buttons that take you to various parts of the program.
The section below (white) contain the current list of patients, which as you would expect is empty to start off with.
![]()
Lets look at control button in more detail.

1) ![]() Brings up the Pathology Central Screen. More information see Generating daily worksheet section.
Brings up the Pathology Central Screen. More information see Generating daily worksheet section.
2)  The dropdown box Unit List will contain your default work unit's name. The Update Inpatient List button is for updating the current inpatient list for the work unit.
3) ![]()
The Browse patient detailsbutton will bring up the Browse patient details screen. More information
The Path Round button will bring up the path round screen. More information
The Write handover button will bring up the handover screen. More information.
4) 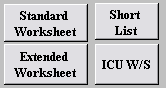 This set of 4 buttons will take you to preview and print different types of unit worksheets. More information.
![]() This dropdown box is use for managing multiple lists of patients. You can create a new list (such as referrals list) by clicking the New button. More information.
This dropdown box is use for managing multiple lists of patients. You can create a new list (such as referrals list) by clicking the New button. More information.
5) ![]() Exit button (same button used throughout the whole database)
Exit button (same button used throughout the whole database)
![]()
Updating Patient List
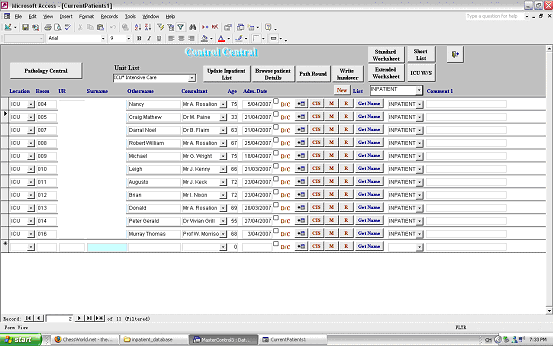
To populate the patient list with the current inpatients of your unit, simply click on the Update Inpatient List button. An input box will appear where you enter your PAS username and password. No username or password will be stored in the database.
When complete, the following screen is what you will see. The patient list has now been populated with inpatients.
UR and surname removed for confidential purpose.
Sometimes when patients have been discharged, a screen will appear asking you to confirm that the patients has indeed been discharged.
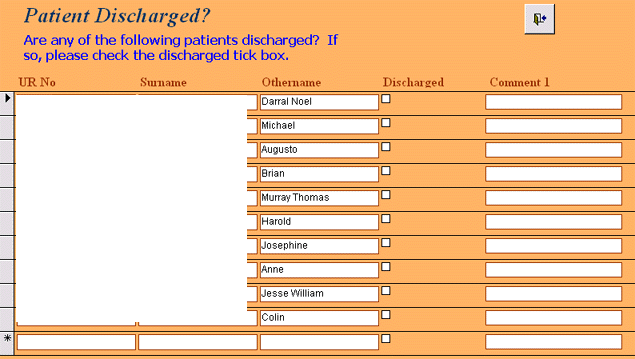
UR and surname removed for confidential purpose.
If a patient has been discharged, you can confirm discharge by simply checking the box under Discharged. You can also place notes in the Comment field, such as whether the patient was discharged home or transferred to another unit.
Then click on the ![]() button to return to control central.
button to return to control central.
![]()
How to work with Patient List.

UR and surname removed for confidential purpose.
By updating the patient list the following information are all populated for you - Location, Room, UR, Surname, Othernames, Consultant, Age, Admission date.
All of these information can be changed as you please.
Let's talk a bit more about the different components of the Patient List:
1) D/C check box - Tick the D/C check box when the patient has been discharged.
2) ![]()
The first button next to D/C check box will take you to further details about that particular patient. See section - Managing patient details.
CIS button - will bring up a web browser with the patient's pathology and radiology results.
M button - will bring up a web browser with patient's microscopy results
R button - will bring up the Radiology browser.
Get Name button - This is useful when creating user defined patient lists such as a Referrals list.
See more details on section on Maintaining Extra patient lists.
The dropdown box next to Get Name button - allows you to move patients between user defined lists.
Comment field - you can put some comments about each patient. such as the discharge plan when a patient has been discharged.
Next Section - Generating Daily worksheet
MasterControl database is copyright (c) Dr (George) Yu Xiang, Kong 2007.
DISCLAIMER: MasterControl database is developed as a proof of concept. Use this database at your own risk. Dr Yu Kong will not accept responsibility for any loss loss of data, incorrect data retrieval or incorrect clinical decisions made.